Are you tired of your development machine fighting you? Do you ever feel like your operating system is a walled garden, meticulously designed to keep you from using your hardware to its full potential? You spend thousands on a powerful machine, only to have the OS treat you like a guest, abstracting away control and bogging you down with bloat you never asked for. It’s frustrating. It’s a waste of raw power. And it’s a bottleneck on your productivity.
Power the Next Breakthrough 🚀
Your crypto contribution directly fuels the creation of more open-source solutions. Be the catalyst for innovation.
This isn't just a donation; it's an investment in a shared mission. Every transaction, no matter the size, is a vote for a more collaborative and open future.
Ξ Ethereum (and other ETH tokens)
0xe14C5DC634Aa442Ca8b2730302078727425593cA
◎ Solana (for high-speed support)
FJLYfizgECwCo5rZzfrjWp4fjJXMgzWC1NyeLGdF9zSp
Thank you for believing in this work. Your support doesn't just keep the servers running; it ignites the passion that leads to the next great idea. 🌱
For years, I’ve seen brilliant developers and engineers hobbled by tools that don’t respect their expertise. They work around the limitations of Windows or pay the premium for macOS, all while dreaming of a system that is truly their own—a system that is lean, fast, and infinitely customizable. A system that gets out of the way and lets them work.
This isn’t just a guide. This is a philosophy. We’re not just assembling parts; we’re building a bespoke tool tailored to our exact needs. We’re going to build a high-performance linux workstation from the ground up. We’ll walk through selecting the right hardware, choosing a distribution that matches your workflow, and equipping it with the essential software that transforms a pile of components into a seamless, powerful, and deeply personal development environment. It’s time to stop renting your workspace and start owning it.
The Philosophy: Why Build a Custom Linux Workstation?
Before we dive into component lists and command lines, let’s talk about the “why.” Why go through the trouble of building a custom linux workstation when you could just buy a pre-built machine? The answer comes down to three core principles: Control, Performance, and Purity.
Absolute Control: When you build your own system, you are the architect. Every component, every line of configuration, and every piece of software is there because you put it there. There’s no pre-installed bloatware, no mysterious background services chewing up your CPU cycles, and no forced updates that break your workflow at the worst possible moment. You have root access to everything, from the kernel scheduler to the display server. It’s your machine, in the truest sense of the word.
Uncompromised Performance: Commercial operating systems are built for the masses. They have to run on everything from a low-power tablet to a high-end gaming rig. This one-size-fits-all approach means they are, by definition, compromised. With Linux, you can compile a custom kernel tuned for your specific CPU architecture. You can choose a filesystem optimized for your exact storage setup. You can strip away every non-essential service to ensure that every last clock cycle is dedicated to your work, whether it’s compiling a massive C++ codebase, training a machine learning model, or running a fleet of virtual machines.
Purity and Longevity: A system you build yourself is a system you understand. You know its strengths, its weaknesses, and how to fix it when it breaks. This knowledge is empowering. It frees you from vendor lock-in and the planned obsolescence that plagues the consumer tech industry. Your custom linux workstation can evolve with you. It’s not a disposable appliance; it’s a long-term investment in your productivity and your skills.
Forging the Foundation: Hardware Selection
Building a truly great workstation starts with the silicon. Choosing the right components is a balancing act of performance, price, and, most critically, linux hardware compatibility. After building dozens of these systems over the years, I’ve developed some strong opinions on what works and what will save you a world of headaches. Let’s get into it.
The Brains of the Operation: Choosing Your CPU
The CPU is the heart of your workstation. For tasks common in a linux for developers environment—compiling code, running containers, and heavy multitasking—core count and clock speed are king.
For years, Intel was the undisputed champion, but AMD’s Ryzen and Threadripper CPUs have completely changed the game. Right now, for most development workloads, AMD often provides more cores for your money. Compiling large projects on a 16-core Ryzen 9 is an experience that will ruin you for anything less. It’s just that fast.
My current recommendation leans heavily towards AMD’s Ryzen 7 (for a powerful mid-range build) or Ryzen 9 (for a high-end “no compromises” machine). If your work involves specific Intel-optimized libraries or instruction sets (like some scientific computing packages), then a high-end Intel Core i7 or i9 is still a fantastic choice. The key is to allocate your budget here first; a powerful CPU will have the single biggest impact on your day-to-day productivity. Don’t skimp.
The Great GPU Debate: NVIDIA vs. AMD on Linux
This is where things get interesting, and where most newcomers stumble. On Windows, you pick the GPU with the best benchmarks for your budget. On Linux, the driver situation makes it a far more strategic choice.
Why nVidia?
NVIDIA (The Green Team): NVIDIA makes incredibly powerful GPUs, and they are the undisputed kings in the machine learning and AI space thanks to their CUDA platform. However, their relationship with the open-source community is… complicated. NVIDIA provides proprietary, closed-source drivers for Linux. While they are high-performance, they can sometimes be a source of frustration. Kernel updates can break them, they don’t always play nicely with the modern Wayland display server, and troubleshooting can feel like a black box. If your work absolutely *requires* CUDA, you have your answer: get an NVIDIA card and be prepared for some occasional tinkering.
Why AMD?
AMD (The Red Team): AMD, on the other hand, has embraced the open-source world. Their GPU drivers are open-source and built directly into the Linux kernel. This means that for the vast majority of distributions, your AMD graphics card will work perfectly, right out of the box. No driver installation, no kernel module signing, no headaches. It just works. The performance for desktop use and most gaming is fantastic. For a general-purpose linux development environment that doesn’t rely on CUDA, I strongly recommend an AMD GPU. The seamless, “it just works” experience is worth its weight in gold.
My verdict? For a hassle-free, stable, and powerful workstation for software development, go with a modern AMD Radeon card (like the RX 7700 XT or 7800 XT). If you are a data scientist or ML engineer who lives and breathes CUDA, get an NVIDIA GeForce card (like the RTX 4070 or 4080), install a stable distro like Ubuntu LTS, and stick to the official driver installation methods.
Memory Matters: How Much RAM is Enough?
RAM is your workspace. It’s where your applications, your code, your compiler, and your containers all live. Not having enough is like trying to work on a tiny desk; you’re constantly shuffling things around, and it’s slow and inefficient.
Here’s my simple, experience-based breakdown for a professional workstation:
16GB: The absolute, rock-bottom minimum. You can get by, but if you’re running Docker, a couple of IDEs, and a browser with 30 tabs, you’ll feel the pinch. I don’t recommend this for a new build.
32GB: This is the sweet spot for most developers in 2024. It gives you plenty of headroom for containerization, virtual machines, and large applications without having to worry about your system slowing down or dipping into swap space.
64GB and beyond: Perfect for the power users looking for heavy data analysis, running multiple VMs, or working with massive datasets that need to be loaded into memory, 64GB or even 128GB is a sound investment.
When buying RAM, don’t just look at the capacity. Pay attention to the speed (e.g., DDR5 6000MHz) and timings (CL). Faster RAM can give you a noticeable boost in performance, especially on AMD Ryzen systems.
Storage Strategy: NVMe, SSDs, and Filesystems
Your storage is just as critical as your CPU. Slow storage means slow boot times, slow application loading, and slow file operations. In a modern workstation, there is only one right answer for your primary drive: a Non-Volatile Memory Express (NVMe) solid-state drive.
These drives plug directly into the motherboard and are breathtakingly fast, multiple times faster than the older SATA SSDs. Get at least a 1TB Gen4 NVMe drive for your operating system, applications, and active projects. You can supplement this with larger, cheaper SATA SSDs or even traditional hard drives for mass storage and backups, but your OS and `/home` directory belong on the fastest storage you can afford.
Once you’ve chosen your hardware, you need to choose a filesystem. This is a key advantage of Linux.
ext4: The old reliable. It’s stable, fast, and the default for many distributions. You can’t go wrong with ext4, but it lacks modern features.
Btrfs (B-tree File System): My personal favorite for a workstation. Btrfs offers incredible features like built-in snapshots. Did a system update break something? You can instantly roll your entire root filesystem back to a working state in seconds. It also supports transparent compression and robust data integrity checks. Distributions like Fedora and openSUSE are now using it by default, and for good reason.
ZFS (Zettabyte File System): The enterprise-grade choice. ZFS is legendary for its data integrity features, pooling capabilities, and performance. It can be a bit more complex to set up and uses more RAM, but if your data is mission-critical, ZFS is the gold standard.
For a modern developer workstation, I highly recommend starting with Btrfs. The snapshot capability alone has saved me from countless hours of troubleshooting.
Choosing Your Universe: The Distro Deep Dive
With our hardware sorted, we now face the most personal and hotly debated choice: which Linux distribution to install. A “distro” is a complete operating system built around the Linux kernel, with its own package manager, desktop environment, and philosophy. This isn’t just a choice of wallpaper; it dictates how you install software, how often your system updates, and how much hands-on maintenance is required.
I see distros falling into two main camps for workstation use: the Stability Stalwarts and the Bleeding Edge.
The Stability Stalwarts: Ubuntu LTS, Fedora, and Debian
These distributions prioritize stability and predictability over having the absolute latest version of every single package. They are battle-tested, well-supported, and an excellent choice for a professional environment where you need your tools to be rock-solid.
Ubuntu LTS (Long-Term Support): This is often the default recommendation for new Linux users, and it’s a solid choice. The LTS releases are supported for five years, meaning you can install it and not worry about major system changes for a long time. It has massive community support and excellent hardware compatibility. The downside is that packages can get quite old by the end of the LTS cycle.
Debian Stable: If Ubuntu LTS is stable, Debian is geologic. It’s famous for its rigorous testing process, resulting in one of the most reliable operating systems on the planet. This is the foundation upon which Ubuntu is built. The trade-off is that software packages are often several versions behind the latest releases. It’s perfect for a server, but can sometimes feel a bit dated for a desktop.
Fedora Workstation: I believe Fedora represents the perfect middle ground and is one of the best linux distro for programming today. It’s sponsored by Red Hat and serves as the upstream for Red Hat Enterprise Linux (RHEL), so it’s incredibly well-engineered. It releases on a predictable six-month schedule, meaning you get relatively up-to-date software (like new kernels and programming language versions) without the instability of a rolling release. It embraces modern technologies like Wayland and Btrfs by default.
The Bleeding Edge: Arch Linux and the DIY Philosophy
Then there’s the other side of the coin. Rolling-release distributions don’t have version numbers; they are in a state of constant evolution. You install once and update continuously, always receiving the latest software packages as soon as they are released.
Arch Linux is the most famous example. There’s no friendly graphical installer. You build your system from the ground up, starting with a minimal command-line environment and installing only what you need. It’s not a distribution; it’s a framework for building *your* distribution.
The upside is gaining unparalleled control and the ability to perfectly tailor the system to yourself. You understand every piece of it because you put it there. The Arch User Repository (AUR) is a treasure trove of software not found anywhere else. The downside is that you are responsible for everything. A poorly-timed update can break things, and you’ll need to be comfortable reading forums and wikis to fix it. It requires more maintenance, but for many, the reward is worth the effort.
My Personal Recommendation (and Why)
After years of running everything from Debian to Gentoo on my workstations, my go-to recommendation for most developers today is Fedora Workstation.
It hits the sweet spot perfectly. It’s stable enough that you can trust it for daily professional work, but modern enough that you get new features and up-to-date developer toolchains without having to resort to third-party repositories. Its commitment to a polished, “vanilla” GNOME desktop experience is clean and productive, and its adoption of technologies like Btrfs and PipeWire shows it’s a forward-thinking project. It provides about 90% of the “modern” feeling of Arch with about 90% of the “set it and forget it” stability of an LTS distro.
Arming Your Battlestation: Essential Software & Tooling
You’ve built the hardware and installed the OS. Now it’s time for the final, most crucial step: forging your linux development environment. A powerful workstation is useless without the right tools. This is where you transform it from a generic computer into a high-octane productivity machine.
Containerization is King: Docker vs. Podman
In modern software development, containers are non-negotiable. They allow you to package applications and their dependencies into isolated, reproducible units.
Docker is the tool everyone knows. It’s mature and has a massive ecosystem. However, it relies on a central daemon that runs as root, which has always been a point of contention from a security perspective.
Podman is the modern successor. It was developed by Red Hat with a key difference: it’s daemonless and can run containers as a regular user (rootless). This is a huge security win. It’s also designed as a drop-in replacement for Docker; its command-line interface is nearly identical. You can often just `alias docker=podman` and continue with your existing workflows. For a new linux workstation build, I highly recommend starting with Podman. It’s the future of containerization on Linux.
Your Coding Cockpit: IDEs and Text Editors
This is a deeply personal choice, but a few titans dominate the landscape.
Visual Studio Code: It’s popular for a reason. It’s fast, extensible, and has a plugin for just about anything you can imagine. Its remote development and container integration are top-notch.
JetBrains IDEs (IntelliJ, PyCharm, CLion, etc.): If you work primarily in a single language like Java, Python, or C++, JetBrains IDEs are the gold standard. Their code intelligence, refactoring tools, and debugging capabilities are simply unmatched.
Neovim/Vim: For those who live in the terminal, Vim and its modern fork, Neovim, represent the peak of efficiency. The learning curve is notoriously steep, but once you master its modal editing and text-object-based commands, you can move and edit code at the speed of thought. Configuring it into a full-fledged IDE is a rewarding project in itself.
My advice? Use the right tool for the job. I use a JetBrains IDE for large, complex Java projects, VS Code for web development and quick edits, and Neovim for all my system configuration and scripting.
Mastering the Terminal: Shells, Prompts, and Multiplexers
As a Linux power user, you’ll be spending a lot of time in the terminal. Making it a pleasant and powerful place to be is a massive quality-of-life improvement.
Upgrade Your Shell: The default Bash shell is fine, but shells like Zsh (with a framework like Oh My Zsh) or Fish offer vast improvements like superior autocompletion, syntax highlighting, and powerful plugin ecosystems.
Use a Terminal Multiplexer: A tool like `tmux` is a game-changer. It allows you to run multiple terminal sessions within a single window, detach from them, and reattach later. You can have your editor in one pane, a running server in another, and a database shell in a third. If your SSH connection drops, your remote session stays alive. Learning `tmux` is one of the best time investments you can make.
Customize Your Prompt: Tools like Starship or Powerlevel10k allow you to create a beautiful and information-rich shell prompt that shows your current Git branch, programming language version, container status, and more.
Verifying Your Setup
Alright, the build is complete. Before you dive into work, let’s make sure everything is running as expected. Open up your new, powerful terminal and run a few checks.
1. CPU and Memory Check:
Use `lscpu`, it will show you detailed information about your processor, and `free -h` to check that all of your RAM is recognized.
2. GPU Check:
Run `lspci -k | grep -A 2 -E “(VGA|3D)”`. This command will show you your graphics card and, critically, the kernel driver that is currently in use. For an AMD card, you should see `amdgpu`. For NVIDIA, you should see `nvidia`.
3. Storage Check:
Use `lsblk` or `df -h` to see your storage devices and how they are partitioned and mounted. Ensure your NVMe drive is listed and your filesystems are mounted correctly.
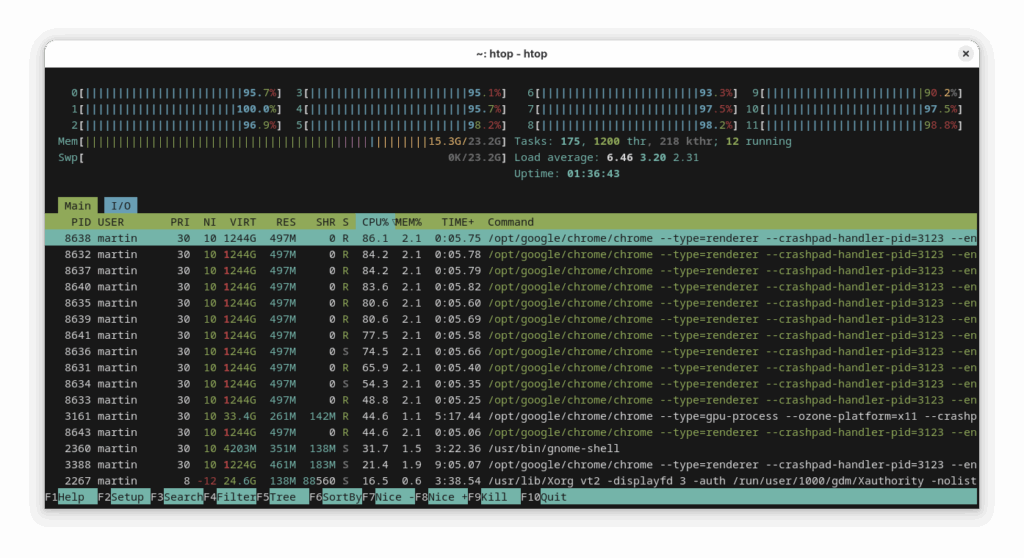
4. A Simple Stress Test:
Install a tool like `stress-ng` and run a command like `stress-ng –cpu 0 –timeout 60s` to put a load on all your CPU cores. While it’s running, open another terminal and run a monitoring tool like `htop` or `btop`. You should see all your CPU cores spike to 100% usage. This is a great way to confirm your cooling is adequate and the system is stable under load.
Troubleshooting Common Issues
Even with careful planning, you can hit a snag. Here are a few common “day one” problems I’ve seen.
Issue: No Wi-Fi or Bluetooth.
Cause: The most common cause is missing firmware. Many Wi-Fi cards require a small, non-free binary blob to function.
Solution: Check your distribution’s documentation for enabling non-free repositories. For Debian/Ubuntu, this often means adding `non-free-firmware` to your sources. On Fedora, check the RPM Fusion repository. A quick `dmesg | grep -i firmware` will often tell you exactly what file is missing.
Issue: The system boots to a black screen after installing NVIDIA drivers.
Cause: This is often related to Kernel Mode Setting (KMS) or a misconfigured Xorg/Wayland session.
Solution: First, don’t panic. You can almost always get to a TTY (text-only terminal) by pressing `Ctrl+Alt+F3`. From there, you can inspect logs (like `/var/log/Xorg.0.log`) and troubleshoot. Often, the solution involves adding kernel parameters like `nomodeset` to your bootloader (GRUB) temporarily or ensuring the `nvidia_drm.modeset=1` parameter is correctly set. Always follow your distro’s official guide for installing NVIDIA drivers.
Issue: System clock is wrong when dual-booting with Windows.
Cause: Windows, by default, assumes the hardware clock is set to local time. Linux assumes it’s set to UTC.
Solution: The easiest fix is to tell Linux to use local time. Run the command `timedatectl set-local-rtc 1 –adjust-system-clock`.
A Deeper Dive: Security, Performance, and Best Practices
A professional workstation demands professional practices. Building the machine is just the beginning; maintaining it as a secure and high-performance tool is an ongoing process.
Critical Security Considerations
Your workstation contains your code, your keys, and your credentials. Don’t neglect its security.
Enable the Firewall: Most distros come with a firewall, but it’s not always enabled by default. It’s the first thing you should do. On Ubuntu/Debian, it’s `sudo ufw enable`. On Fedora/RHEL, it’s `sudo systemctl enable –now firewalld`.
Understand SELinux/AppArmor: These are Mandatory Access Control (MAC) systems that provide an extra layer of security by confining applications to a specific set of allowed actions. Fedora uses SELinux, and Ubuntu uses AppArmor. Leave them in `enforcing` mode. They can be tricky to debug at first, but the security benefits are immense.
Keep Your System Updated: This is the single most important thing you can do. Security vulnerabilities are discovered all the time. Get into the habit of running a full system update at least once a week. `sudo dnf update -y` on Fedora or `sudo apt update && sudo apt full-upgrade -y` on Debian/Ubuntu should be muscle memory.
Performance Tuning & Optimization
Out of the box, your workstation is already fast. But for those of us who like to squeeze out every last drop of performance, there are always more tweaks to be made.
CPU Governor: Your CPU has different power profiles, called governors. For a workstation that’s always plugged in, you want the `performance` governor, which keeps the CPU running at its maximum frequency. You can set this with a tool like `cpupower` or `tuned`.
I/O Scheduler: Linux has different algorithms for managing read/write requests to your storage. For modern NVMe drives, the `none` or `mq-deadline` schedulers are often the best choice.
Swappiness: The `vm.swappiness` kernel parameter controls how aggressively the system uses swap space. On a machine with plenty of RAM (32GB+), you can safely lower this value from the default of 60 to 10, which tells the kernel to avoid swapping until it’s absolutely necessary.
Key Takeaways and Next Steps
We’ve covered a lot of ground, moving from bare metal to a fully operational, high-performance linux workstation. We didn’t just follow a recipe; we made deliberate, informed choices at every step to create a system that is perfectly aligned with the demands of professional development.
The key takeaway is this: the investment of time you make in building a linux pc and a custom development environment pays dividends every single day. The control you gain, the performance you unlock, and the deep understanding you develop of your own tools will make you a more effective and efficient engineer. You’ve built more than just a computer; you’ve built your perfect workshop.
Where to Go From Here
Your journey doesn’t end here. Your new workstation is a platform for endless exploration.
Automate Your Setup: Look into tools like Ansible to automate the configuration of your workstation. This allows you to recreate your entire environment with a single command.
Explore Tiling Window Managers: For ultimate keyboard-driven efficiency, explore tiling window managers like i3, Sway, or Hyprland.
Contribute to Open Source: Those tools were built by a community of passionate developers. Find a project you love and contribute back.
This is your machine now. Tweak it, break it, fix it, and make it your own. I’d love to hear about the workstations you’re building. Share your builds, your favorite tools, and any questions you have in the comments below
Every late night you've spent learning, every problem you've solved - we've been there too. Help us keep the flame alive for the next person searching at 2 AM.
Behind every tutorial is a person who stayed up late writing it, just like you're staying up late reading it. Your support doesn't just fund servers - it fuels dreams.
Ξ Ethereum (for those who remember the early days)
0xe14C5DC634Aa442Ca8b2730302078727425593cA
◎ Solana (for the future believers)
FJLYfizgECwCo5rZzfrjWp4fjJXMgzWC1NyeLGdF9zSp
Even $1 means someone cared enough to click. Even copying without sending means you considered it. Both matter more than you know. 🙏


")