
Let’s be honest. Setting up a proper emulation station on any machine, especially Linux, can be an absolute nightmare. You spend hours, sometimes days, hunting down the right emulators, wrestling with cryptic configuration files, trying to map a controller that seems to have a mind of its own, and praying you’ve put the right BIOS file in the right impossibly-named folder. It’s a frustrating, thankless job that often ends with you giving up and just watching a YouTube video of the game you wanted to play.
I’ve been there. I’ve wasted entire weekends trying to get a perfect, seamless setup, only to have one emulator’s config overwrite another’s, breaking everything. The pain is real. You just want to play Chrono Trigger on your shiny new Steam Deck, not become an unwilling expert in the dependency hell of a dozen different open-source projects.
What if I told you there’s a tool that does all of that heavy lifting for you? A single, elegant script that installs everything, configures it all with sane and optimized defaults, organizes your files, and plugs the entire experience directly into your Steam library, complete with beautiful box art? That tool is EmuDeck, and it’s not an exaggeration to say it’s the single most essential piece of software for anyone interested in steam deck emulation. It transforms the entire process from a multi-day ordeal into a 15-minute automated task. This is the definitive emudeck setup guide you’ve been looking for.
Understanding the “Why” and “How” of EmuDeck
Before we dive into the nuts and bolts, it’s crucial to understand what EmuDeck is and, more importantly, what it isn’t. It’s not a new emulator. It doesn’t run any games itself. Instead, think of EmuDeck as a master architect and an automated construction crew for your retro gaming cathedral.
The Problem We’re Solving
Setting up emulation manually is like building a modern car from scratch, sourcing every individual part from a different factory without a blueprint. You’d need to find an engine (the emulator, like PCSX2 for PS2), a transmission (a frontend like RetroArch), a chassis (the directory structure for your ROMs and saves), and an electrical system (the controller configurations). Then you have to wire it all together yourself. Maybe you get the engine running, but the steering wheel doesn’t work, or the headlights only turn on when you honk the horn. It’s a chaotic mess of individual components that were never explicitly designed to work together seamlessly.

Valve Steam Deck 1TB Upgraded Handheld Gaming Console with Carring case, 1280 x 800 LCD Display Silicone Soft Cover Protector & Joystic Cap & Tempered Glass Film Bundle
- Valve is entering the gaming console marketplace with the new Steam Deck, a console geared towards PC gamers. The Steam Deck can be docked to a monitor, and used as a PC, or docked to a TV.
- Players can play a huge variety of games at any time with the comfort of a console and the freedom of a PC. Not anti-glare screen.
- Like the name suggests, the Steam Deck will include upgraded 1TB storage, and will include a carrying case. A micro SD slot will also enable expanded storage.
List Price :
Offer: 579.99
Go to AmazonYou have to worry about dozens of individual emulators, each with its own quirks. Dolphin for GameCube, PCSX2 for PS2, PPSSPP for PSP, and the massive collection of “cores” within RetroArch for everything from the NES to the Sega Saturn. Each one needs to be installed, updated, and configured. It’s a full-time job.
Our High-Level Solution
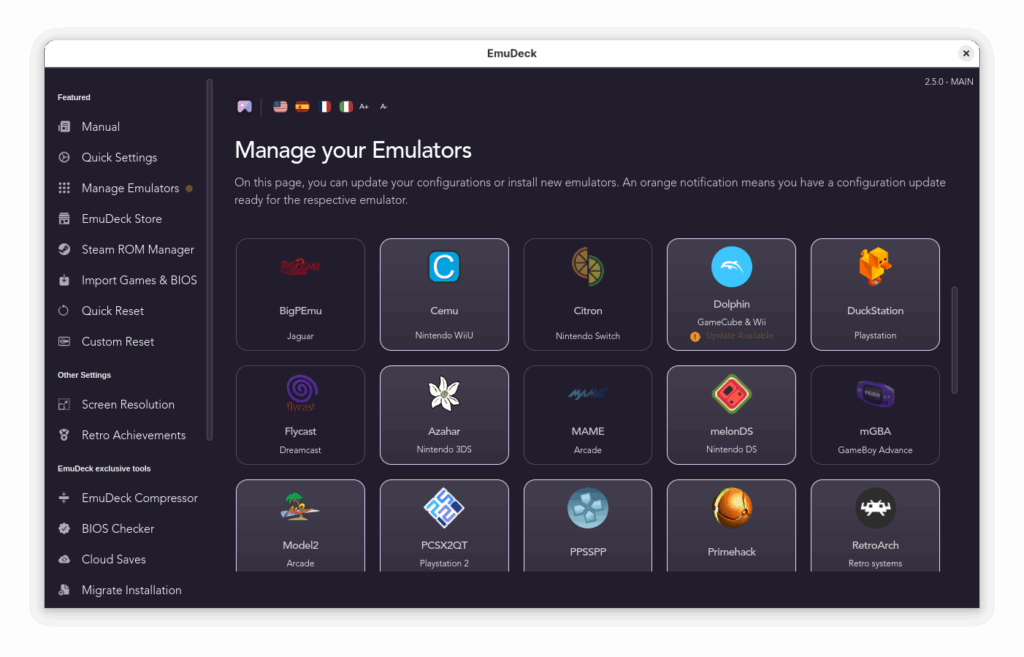
EmuDeck is the blueprint and the assembly line, all in one. It’s an incredibly intelligent shell script that automates the entire end-to-end process. When you run it, it:
- Installs a Curated Set of Emulators: It downloads and installs the best-performing emulators for the Steam Deck and Linux, including standalone powerhouses and the versatile RetroArch.
- Creates a Logical Folder Structure: It builds a clean, easy-to-understand directory tree for your games (ROMs), system files (BIOS), and save files. No more guesswork.
- Applies Optimized Configurations: This is the secret sauce. The EmuDeck team has spent thousands of hours testing and creating a master set of configurations. Controllers are pre-mapped, performance settings are tweaked for the Steam Deck’s hardware, and hotkeys are standardized across all emulators.
- Integrates with Steam: Using a tool called Steam ROM Manager, EmuDeck automatically scans your game library, downloads artwork, and creates individual shortcuts for every single game directly in your Steam library, making them launchable from the standard SteamOS Gaming Mode.
In short, EmuDeck does the 99% of tedious, frustrating work, leaving you to do the 1% that matters: adding your games and playing them.
What You’ll Need Before You Begin
Before we get our hands dirty, let’s gather our tools. The process is straightforward, but having everything ready will make it even smoother.
- A Steam Deck (or Linux PC): While this guide is focused on the Steam Deck, EmuDeck works wonderfully on a wide range of Linux distributions. The process is nearly identical.
- A High-Speed MicroSD Card: I cannot recommend this enough. While you can install everything on the Deck’s internal SSD, a good quality, high-speed (U3, A2 rated) MicroSD card is perfect for storing your ROM and BIOS files. It keeps your internal drive free for modern Steam games and makes your emulation library portable. A 256GB or 512GB card is a great starting point.
- An Internet Connection: The EmuDeck installer needs to download all the emulators and configuration files.
- Keyboard and Mouse (Optional but Recommended): You can do everything with the Steam Deck’s trackpads and virtual keyboard, but for the initial setup and transferring files, a cheap USB-C hub with a basic keyboard and mouse makes life much easier.
- Your Legally-Sourced Game and BIOS Files: This is the one thing EmuDeck cannot provide. You are responsible for acquiring your own game ROMs and the necessary BIOS files from consoles you legally own. Please do not ask me where to find them. A quick search on emulation ethics and legal requirements will point you to the right resources for your region. We’re building the system here, but you have to stock the library.
- Basic Knowledge of Steam Deck Desktop Mode: You should know how to switch your Steam Deck from its default Gaming Mode to the underlying Linux desktop. (Hint: Press the STEAM button, go to Power, and select Switch to Desktop).
EmuDeck Installation and Setup Guide
Alright, let’s get to the main event. Grab your Deck, switch it to Desktop Mode, and follow along. I promise, this is where the magic happens, and it’s easier than you think.
Download the EmuDeck Installer
First things first, we need the installer script itself. Don’t just search for it on a random site; always get it from the source to ensure you have the latest and safest version.
- Open the Firefox web browser on your Steam Deck’s desktop.
- Navigate to the official EmuDeck website: www.emudeck.com.
- Click the prominent “Download” button. This will download the installer file, which should be named something like
EmuDeck.desktop.zip. - Once downloaded, open the Dolphin file manager and navigate to your
/home/deck/Downloadsfolder. - Right-click (or long-press with the touch screen/left trigger) on the downloaded zip file and choose “Extract > Extract archive here”. This will create a file named
EmuDeck.desktop.
Run the Installer and Make Key Choices
Now we execute the script that will build our emulation empire. It’s designed to be user-friendly, guiding you through the most important decisions.
- Drag the
EmuDeck.desktopfile from yourDownloadsfolder directly onto your Desktop for easy access. - Double-click the
EmuDeck.desktopicon. A confirmation window will pop up. Click “Continue”.
The EmuDeck installer will launch, and you’ll be presented with a series of choices. Let’s walk through them.
Easy Mode vs. Custom Mode:
For 99% of users, especially first-timers, Easy Mode is the way to go. It uses the community-vetted, optimized settings that work perfectly out of the box. Custom Mode is for tinkerers who want to disable specific emulators or tweak advanced settings. We’re sticking with Easy Mode for this guide. You can always re-run the installer later to change things.
Installation Path (Internal Storage vs. SD Card):
This is your most important choice. EmuDeck will ask where you want to install everything. You’ll see two options: Internal Storage or your SD Card (if one is inserted). I strongly recommend selecting the SD Card. This installs the entire Emulation folder structure on your removable storage, keeping your internal SSD pristine and making it easy to manage your library. Select your SD Card and click Next.
Device Selection:
EmuDeck is smart. It will auto-detect that you’re running it on a Steam Deck and pre-select the appropriate device profile. Just confirm it’s correct and continue.

Now, sit back and relax. EmuDeck will proceed to download and install a whole suite of software. You’ll see terminal windows flash by as it fetches RetroArch, Dolphin, PCSX2, Yuzu, and many others. It’s also laying down all the pre-configured files and building the directory structure. This can take anywhere from 5 to 15 minutes depending on your internet speed. Let it do its thing.
Post-Install Configuration
Once the installation is complete, you’ll be prompted with a few final, but crucial, configuration options. EmuDeck puts these front and center for a reason.
Emulator Settings and Aspect Ratios:
You’ll be asked to configure aspect ratios and bezels for various systems. My recommendation for the most authentic experience is to stick with the default aspect ratios (e.g., 4:3 for SNES, PlayStation). For the bezel option, I highly recommend enabling it. When you play a 4:3 game on the Deck’s 16:10 screen, this feature fills the black bars on the sides with beautiful, system-specific artwork instead of just empty space. It’s a gorgeous touch.
Steam ROM Manager:
The installer will finish by asking if you want to open Steam ROM Manager. We’ll do this in a later step, so you can exit the EmuDeck application for now. We need to add our games first!
Managing Your Games, BIOS, and Artwork
EmuDeck has built the stadium; now it’s time to bring in the players. This part involves transferring your legally-owned game and BIOS files to the structure EmuDeck just created.
Understanding the EmuDeck Directory Structure
Open the Dolphin file manager. If you installed on your SD Card, navigate there (it will be listed in the “Removable Devices” section). You will see a new folder named Emulation. This is your new home base. Inside, the structure is beautifully simple:
/Emulation/bios: This is where all required BIOS files go. They need to be placed directly in this folder./Emulation/roms: This folder contains subfolders for every single console imaginable (e.g.,snes,psx,gcfor GameCube, etc.). This is where your game files belong./Emulation/saves: As you play games, your save files and save states will be neatly stored here, making backups a breeze./Emulation/tools: Contains helper applications and tools, including the Steam ROM Manager itself.
Placing Your BIOS Files
Certain consoles, particularly those from the CD-ROM era like the PlayStation (PSX), Sega CD, and PlayStation 2 (PS2), require a BIOS file to function. This is the console’s original firmware, and emulators need it to boot the games.
You must place your legally-sourced BIOS files directly into the /Emulation/bios folder. The filenames must be exact. They are often case-sensitive. EmuDeck maintains a handy “cheatsheet” on its wiki that lists the required BIOS files and their correct names. I highly recommend checking the Official EmuDeck Wiki for this information. Get your BIOS files right, and you’ll save yourself a major headache.
Adding Your Game ROMs
This is the fun part. Gather your game ROMs and copy them into the appropriate folders within /Emulation/roms. For example:
- Super Mario World.sfc goes into
/Emulation/roms/snes/ - Metal Gear Solid.chd goes into
/Emulation/roms/psx/ - Metroid Prime.iso goes into
/Emulation/roms/gc/
The folder names are intuitive. Take your time and organize your library correctly. A well-organized ROM folder is a happy ROM folder.
Running Steam ROM Manager to Finalize Integration
With our BIOS and ROMs in place, it’s time for the final, magical step. We will use Steam ROM Manager to add everything to the Steam interface.
- On your Desktop, launch the EmuDeck application again.
- From the main EmuDeck screen, click the “Tools & stuff” button.
- Find Steam ROM Manager in the list and click “Launch”.
- If Steam is running, Steam ROM Manager will ask you to close it. Allow it to do so.
You are now in the Steam ROM Manager interface. It might look a little intimidating, but the process is simple.
- In the top left, click the “Preview” button.
- On the next screen, click the “Generate App List” button. Steam ROM Manager will now scan all the folders in
/Emulation/roms. It will identify your games, match them with an online database, and download stunning artwork, logos, and icons for each one. You’ll see the preview pane on the right populate with your library. - Once it’s finished, take a moment to admire your new library. It looks incredible, right?
- When you’re satisfied, click the “Save app list” button. The tool will then write all of this information into your Steam configuration. This is the step that actually adds the games.
That’s it! You can now close Steam ROM Manager.
Returning to Gaming Mode
On your desktop, double-click the “Return to Gaming Mode” icon. Your Steam Deck will restart into its familiar interface. Navigate to your Library and go to the “Collections” tab. You’ll see beautiful new collections, one for each console you added games for! Alternatively, you can go to the “Non-Steam” tab in your main library to see everything in a single list. Your entire retro gaming history is now at your fingertips, perfectly integrated.
Verifying Your Setup
Before you get lost in nostalgia, let’s run a quick end-to-end test to make sure the core systems are working as expected.
End-to-End Validation
- From Gaming Mode, navigate to your new Nintendo collection and select a classic like The Legend of Zelda: A Link to the Past.
- Press “Play”. The game should launch seamlessly, complete with the custom bezels we enabled earlier.
- While in-game, press down on both analog sticks (L3 + R3) simultaneously. The RetroArch Quick Menu should pop up as an overlay. This is your command center for save states, shaders, and advanced settings. This confirms that the global hotkeys are working correctly.
- Press (L3 + R3) again to close the menu.
- Hold the STEAM button and choose “Exit Game”.
If you were able to do all of that, congratulations. Your EmuDeck installation is a complete success. You now have a world-class emulation machine.

Retroid Pocket 5 Retro Handheld Game Console, 8+128G, 5.5-inch Touchscreen 1080p Portable Android Gaming Handheld with Adreno 650 GPU & WiFi 6/BT5.1, Snapdragon 865 Processor, Android 13 (Black)
- NO PRELOAD GAMES – Please note that no games are preloaded on Retroid Pocket 5.
- Powerful Performance – Equipped with a high-performance quad-core processor and advanced GPU, the Retroid Pocket 5 delivers smooth gameplay for retro and modern indie titles, and more with ease, ensuring lag-free gameplay.
- Vibrant 5.5″ Touchscreen – Enjoy crisp, vivid visuals on the 5.5-inch HD touchscreen display, offering intuitive controls and an immersive gaming experience on the go.
New starting from: 259.00
Go to AmazonTroubleshooting Common Issues
Even with a tool as robust as EmuDeck, you might run into a hiccup. Here are a few common issues and how to crush them.
- Issue: A specific console (e.g., PS1/PS2/Saturn) won’t launch any games.
Cause: This is almost always a BIOS issue. The emulator cannot start without the correct system firmware.
Solution: Go back to Desktop Mode and open your/Emulation/biosfolder. Double-check that the required BIOS file is present and, crucially, that it is named exactly right (it’s case-sensitive!). Refer to the EmuDeck Wiki’s BIOS page to verify the correct filenames. - Issue: Some of my games are missing from my Steam Library after running Steam ROM Manager.
Cause: This could be an incorrect file extension, the ROM being in the wrong folder, or a parser issue.
Solution: First, verify your ROM is in the correct subfolder (e.g.,n64for a Nintendo 64 game). Second, check that the file format is supported. In Steam ROM Manager, you can click on “Parsers” on the left and see which file types are being scanned for each system. Ensure your game’s extension is listed. - Issue: Performance is stuttery for high-end systems like PS2, GameCube, or Switch.
Cause: While the Steam Deck is a beast, some games are very demanding. Default settings aim for a balance of compatibility and performance.
Solution: EmuDeck installs a Decky Loader plugin called PowerTools. You can access it from the Quick Access Menu (the “…” button) and adjust the CPU’s SMT or thread count, which can help some emulators. You can also go into the individual emulator’s settings (e.g., launch PCSX2 from Desktop Mode) and lower the internal rendering resolution from 3x to 2x or even native 1x.
A Deeper Dive: Security, Performance, and Best Practices
EmuDeck gets you 95% of the way to perfection. For those who want to push that final 5%, here are some advanced considerations.
Critical Security Considerations
You are downloading and running a script from the internet. This requires a level of trust. The EmuDeck project is highly reputable and open-source, meaning its code can be inspected by anyone. However, you should always download the installer directly from the official emudeck.com website. Do not download it from third-party sites or random links, as they could be tampered with.
Performance Tuning & Optimization
EmuDeck’s defaults are fantastic, but you can always tweak them. In Desktop Mode, you can launch any of the standalone emulators directly from the Application Launcher. From there, you have access to all of their advanced graphical and performance settings.
For example, in PCSX2 (the PS2 emulator), you can go to Settings > Graphics and change the “Internal Resolution” to fine-tune the balance between visual clarity and performance for each game. For RetroArch, the Quick Menu (L3+R3) is your gateway to applying CRT shaders for an authentic retro feel or enabling features like “Run-Ahead” to reduce input lag.
I also highly recommend exploring the EmuDeck Cloud Sync feature. It allows you to use services like Dropbox or Google Drive to sync your save files across multiple devices. Play on your Steam Deck on the go, then pick up right where you left off on your Linux desktop at home. It’s a game-changer.
Conclusion: Key Takeaways and Your Next Retro Adventure
If you’ve made it this far, you’ve done more than just install some software. You’ve transformed your Steam Deck from a modern gaming portable into a comprehensive, all-in-one time machine capable of playing nearly every classic game ever made. The true genius of EmuDeck is that it democratizes the world of steam deck emulation, making it accessible to everyone, not just seasoned Linux veterans.
What was once a complex, multi-day project filled with frustration is now a streamlined, automated process that respects your time and delivers a polished, premium experience. It is, without a doubt, the definitive emudeck setup guide to unlocking the full potential of your hardware.
Where to Go From Here
Your journey doesn’t end here. This is just the beginning. I encourage you to explore the official EmuDeck Wiki further, experiment with different shaders in RetroArch, and maybe even try setting up a more obscure system. The EmuDeck team also has a fantastic Discord community where you can ask questions and share your experiences with fellow retro gaming enthusiasts.
You’ve built the ultimate retro gaming library. Now go enjoy it.
What’s the first classic game you’re going to fire up on your newly configured Steam Deck? Let me know in the comments below!